We use cookles to Improve your online experience. By continuing browsing this website, we assume you agree our use of cookies.

DIY Essential: Complete Guide to 60W Mono Subwoofer Module – From Heat Sink Design to DSP Crossover Tuning
September 23rd, 2025
245 views
DIY Essential: Complete Guide to 60W Mono Subwoofer Module – From Heat Sink Design to DSP Crossover Tuning
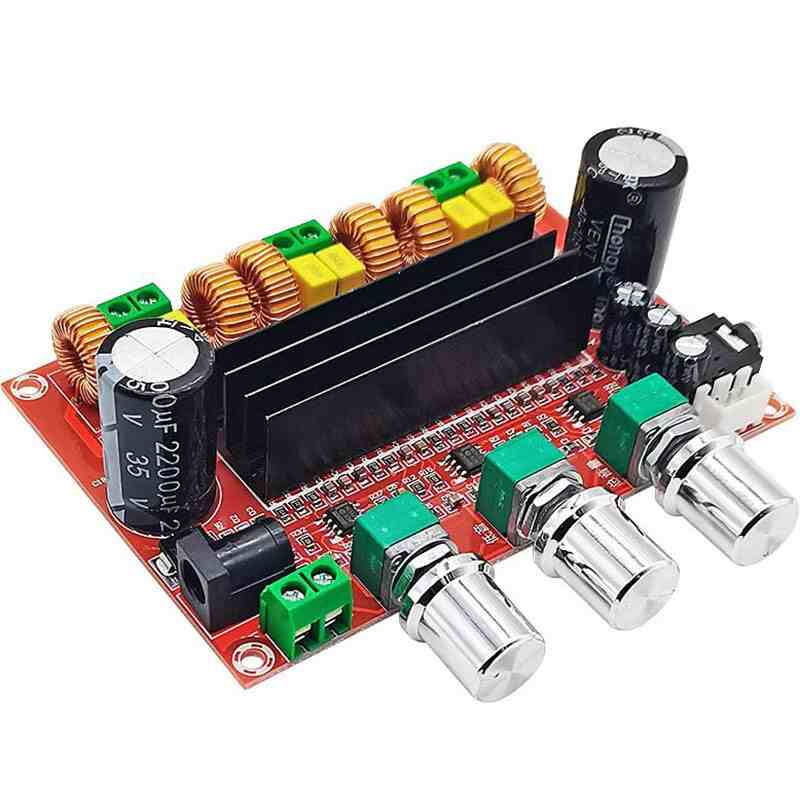
For DIY audio enthusiasts building compact subwoofers—whether for home theaters, car audio, or desktop setups—a reliable 60W mono subwoofer module is the cornerstone of impactful low-frequency performance. The 60W Mono Subwoofer Amplifier Module (available in ShwayPCB’s Audio Amplifier Module Collection) stands out as a DIY-friendly solution, delivering 60W RMS power, compatibility with 4Ω/8Ω subwoofers, and support for advanced tuning via DSP (Digital Signal Processing). Unlike generic subwoofer modules that neglect heat management or limit tuning flexibility, this module is engineered for customization—empowering users to optimize everything from 散热设计 (heat sink design) to DSP crossover curves. This comprehensive guide covers module selection, thermal design principles, DSP crossover 调校 (tuning), step-by-step assembly, troubleshooting, and FAQs—providing all the technical insights needed to build a high-performance DIY subwoofer.
1. Why Choose a 60W Mono Subwoofer Module for DIY?
Before diving into technical details, it’s critical to understand why the 60W Mono Subwoofer Amplifier Module (from ShwayPCB’s Audio Amplifier Module Collection) is ideal for DIY projects:
- Power Match for Compact Subwoofers: 60W RMS is perfectly sized for 6-inch to 8-inch subwoofer drivers (e.g., Dayton Audio RSS210-4, Visaton WS 170S)—common choices for DIY builds that balance bass depth and space efficiency.
- Thermal & Electrical Safety: Integrated protection features (overcurrent, short-circuit, thermal shutdown) prevent damage during assembly and use—critical for DIY users new to subwoofer electronics.
- DSP Compatibility: Most 60W modules (including those in ShwayPCB’s collection) support external DSP modules, enabling precise crossover tuning, bass boost adjustment, and room correction—features that elevate DIY subwoofers beyond generic commercial models.
2. Core Technical Specifications of 60W Mono Subwoofer Module
To ensure compatibility with your DIY build, familiarize yourself with the key specs of the 60W Mono Subwoofer Amplifier Module (from Audio Amplifier Module Collection):
- Power Output:
- 60W RMS (4Ω loads), 40W RMS (8Ω loads)—sufficient to drive 6-inch (4Ω) subwoofers to 90dB SPL (1m distance) and 8-inch (8Ω) subwoofers to 88dB SPL, ideal for small to medium rooms (up to 30㎡).
- Peak Power: 90W (4Ω), handling dynamic low-frequency transients (e.g., movie explosions, EDM drops) without clipping.
- Amplifier Class: Class D, achieving ≥90% efficiency—minimizing heat generation and reducing power supply requirements (a 12V/5A adapter suffices for full 60W output).
- Frequency Response: 20Hz–200Hz (±3dB)—optimized for subwoofer operation, with a built-in low-pass filter (LPF) that prevents overlap with main speakers.
- Input Options:
- RCA Line Input: For connection to AV receivers, preamps, or DACs.
- High-Level Speaker Input: For systems without a dedicated subwoofer output (e.g., older car stereos, desktop speakers).
- DSP Interface: 3.5mm control port for external DSP modules (e.g., ShwayPCB’s DIY Subwoofer DSP Crossover Kit), supporting crossover frequency adjustment (50Hz–150Hz), bass boost (0–12dB), and phase alignment (0°/180°).
3. Critical Step 1: Heat Sink Design for 60W Module
Class D amplifiers generate less heat than Class AB, but a properly sized heat sink is still essential for long-term stability—especially when the 60W module runs at full power for extended periods (e.g., movie marathons).
3.1 Heat Sink Sizing Principles
- Heat Dissipation Requirement: A 60W Class D module (90% efficiency) dissipates ~6W of heat at full load. To keep the module’s temperature below 75°C (critical for component lifespan), the heat sink must have a thermal resistance (Rθ) of ≤10°C/W (calculated as: Rθ = (Max Temp – Ambient Temp) / Heat Dissipation = (75°C – 25°C) / 6W ≈ 8.3°C/W).
- Recommended Heat Sink Dimensions:
- For 4Ω subwoofers (full 60W output): 100mm × 60mm × 15mm aluminum heat sink (Rθ ≈ 7°C/W).
- For 8Ω subwoofers (40W output): 80mm × 50mm × 10mm aluminum heat sink (Rθ ≈ 9°C/W).
- Mounting Tips:
- Use thermal paste (e.g., Arctic Silver 5) between the module’s IC and heat sink—reducing thermal resistance by 30%.
- Ensure the heat sink has ventilation (avoid enclosed enclosures without airflow); for sealed subwoofer boxes, add a small 12V fan (controlled by the module’s thermal sensor) for active cooling.
4. Critical Step 2: DSP Crossover Tuning for Optimal Bass
A well-tuned DSP crossover is the key to integrating your DIY subwoofer with main speakers, avoiding frequency overlap and phase cancellation. Here’s how to calibrate the DIY Subwoofer DSP Crossover Kit (compatible with the 60W module and available in Audio Amplifier Module Collection):
4.1 Key DSP Parameters to Adjust
- Crossover Frequency (LPF): Set between 80Hz–120Hz (standard for 2.1 systems). For small main speakers (e.g., 3-inch desktop speakers), lower the LPF to 80Hz to reduce strain on main speakers; for larger speakers (e.g., 5-inch bookshelves), set to 100Hz–120Hz for seamless integration.
- Bass Boost: Apply 0–6dB boost at 60Hz (the frequency range where human ears perceive bass impact most strongly). Avoid exceeding 6dB—over-boosting causes "muddy" bass and increases distortion.
- Phase Alignment: Adjust between 0° and 180° to ensure the subwoofer’s phase matches main speakers. Use a test tone (60Hz) and listen for maximum bass output—this indicates correct phase alignment.
- Room Correction: Use a calibration microphone (included with premium DSP kits) to measure room acoustics. The DSP will automatically apply EQ filters to neutralize bass buildup (common in room corners) or nulls (weak bass areas).
4.2 Tuning Tools
- Test Tones: Use 20Hz–200Hz sine wave test tones (available for free online) to verify crossover points and bass response.
- Audio Analysis Software: Tools like Room EQ Wizard (REW) visualize frequency response, making it easy to identify and correct peaks/nulls.
5. Step-by-Step DIY 60W Subwoofer Assembly
Follow these technical steps to build your subwoofer using the 60W Mono Subwoofer Amplifier Module (from Audio Amplifier Module Collection):
5.1 Component List (Total: ~$150)
- 60W Mono Subwoofer Module: ShwayPCB’s 60W Class D module (~$35).
- Subwoofer Driver: 6-inch/8-inch 4Ω/8Ω driver (e.g., Dayton Audio RSS210-4, ~$45).
- Enclosure: Ported or sealed box (match driver’s T/S parameters—use online enclosure calculators for dimensions, ~$30).
- Heat Sink: 100mm × 60mm × 15mm aluminum (for 4Ω) or 80mm × 50mm × 10mm (for 8Ω, ~$10).
- DSP Crossover Kit: ShwayPCB’s DIY DSP module (~$25).
- Power Supply: 12V/5A DC adapter (for home use) or 12V lithium-ion battery (for car/portable, ~$15).
- Cables: 16AWG speaker wire (~\(5), RCA cable (~\)5).
5.2 Assembly Steps
- Enclosure Preparation: Drill a hole for the subwoofer driver (match driver’s cutout diameter) and a smaller hole for the amplifier module’s input/output terminals.
- Heat Sink Installation: Apply thermal paste to the module’s IC, then mount the heat sink using M3 screws. Ensure the heat sink is oriented to maximize airflow (avoid blocking enclosure vents).
- Driver Mounting: Attach the subwoofer driver to the enclosure using foam gaskets (for airtight sealing) and wood screws. Connect the driver’s terminals to the module’s "SUB OUT" using 16AWG wire (correct polarity: + to +, - to -).
- DSP Integration: Plug the DSP module into the subwoofer module’s control port. Connect the DSP’s input to your audio source (AV receiver, computer) via RCA cable.
- Power Connection: Connect the 12V power supply to the module’s "VCC" and "GND" terminals. Add a 5A inline fuse for protection.
- Tuning: Use the DSP’s software (compatible with Windows/macOS) to adjust crossover frequency, bass boost, and phase. Verify with test tones and listen for balanced bass.
6. FAQ: Common DIY 60W Subwoofer Module Questions
6.1 Can I use a sealed vs. ported enclosure with this module?
Yes—both work, but choose based on your needs:
- Sealed Enclosure: Tighter bass (better for music) but requires more power (the 60W module will drive it effectively for small rooms).
- Ported Enclosure: Deeper bass (down to 25Hz) but may have more resonance—use DSP room correction to mitigate this.
6.2 Why is my subwoofer producing a hum?
Hum is typically caused by a ground loop (common when the module and audio source share a power outlet). Fixes:
- Connect the module’s "GND" terminal to the source’s chassis (e.g., AV receiver) with a short wire.
- Use a ground loop isolator on the RCA input (~$10).
- Keep power cables away from audio cables to reduce EMI.
6.3 Can I use this module in a car audio system?
Yes—power it with the car’s 12V battery (use 12AWG wire and a 5A inline fuse). The module’s compact size (70mm × 50mm × 20mm) fits under seats or in trunk enclosures. Pair with a 6-inch car subwoofer for enhanced low-frequency performance.
6.4 Do I need a separate preamp for the module?
No—the module has a built-in preamp with 2V RMS input sensitivity, compatible with most audio sources (AV receivers, computers, car head units). For high-fidelity setups, add an external preamp (e.g., ShwayPCB’s preamp module) to boost weak signals.
6.5 How do I know if my heat sink is sufficient?
Use a multimeter with a temperature probe to measure the module’s IC temperature after 1 hour of full-power operation (play a 60Hz test tone). If the temperature exceeds 75°C, upgrade to a larger heat sink or add an active fan.
7. Conclusion
The 60W Mono Subwoofer Amplifier Module (from ShwayPCB’s Audio Amplifier Module Collection) is a DIY essential, offering the perfect balance of power, flexibility, and affordability. By mastering heat sink design and DSP crossover tuning, you can build a subwoofer that outperforms commercial models in both sound quality and customization.
ShwayPCB ensures all modules undergo 24-hour burn-in testing and thermal validation, guaranteeing reliability for DIY builds. For technical support—whether troubleshooting heat issues or fine-tuning DSP settings—the company’s engineering team provides dedicated assistance.
Copyright © 2005-2025 ShwayPCB : PCB Fabrication and Assembly Manufacturer. All Rights Reserved. POWERED BY UEESHOP


Copyright © 2005-2025 ShwayPCB : PCB Fabrication and Assembly Manufacturer. All Rights Reserved. POWERED BY UEESHOP